The glasses will not stream to any third-party app out of the box. Three things have to be
true first, and only one of them lives inside CamVerse. This page walks through all three,
in order, with the exact screens you will see.
~15 minutesAndroid 12 or newerRay-Ban Meta (all generations)Updated August 2026
Read this first
The single most common reason the glasses never connect is that the
DAT app is not installed on the glasses themselves. It is a separate
component from the Meta AI phone app, it is off by default, and nothing in CamVerse can
install it for you. That is step 6 — do not skip it.
What you need
✓Ray-Ban Meta glasses, charged above 30% and unfolded. Folded glasses refuse every streaming request — the hinge sensor gates the camera.
✓An Android phone on version 12 or newer. CamVerse will not install below that.
✓The Meta AI app, updated, with your glasses already paired to it.
✓A Meta account on the CamVerse tester list. Meta's Wearables Device Access Toolkit is still in developer preview, so I have to add each account by hand — see step 1.
1
Request access with your Meta account
Meta's toolkit only lets allow-listed accounts register a third-party app
against their glasses. Until your account is on that list, the authorisation screen in
step 8 will simply never appear, no matter how correct everything else is.
Send me the email address of the Meta account your glasses are paired to
— the one you use in the Meta AI app. I add it to the CamVerse tester list on the Meta
Wearables console, and reply when it is active.
What I do with it
The address is used for one thing only: adding you to the tester list on the Meta
Wearables console so the glasses accept CamVerse. It is not published anywhere, not
shared with anyone, and not used to send you anything else. Ask me and I remove it.
2
Install CamVerse
Nothing special here — CamVerse is a public app on Google Play. Search
for it or use the button below, and install it like anything else.
Two different thingsThe app is open to everyone. The glasses feature is not. Anyone can
install CamVerse and record with their phone cameras straight away — the tester list from
step 1 gates only the Ray-Ban Meta connection, because that restriction comes from Meta's
side, not mine.
3
Pair the glasses in the Meta AI app
Everything from here happens in the Meta AI app, not in CamVerse. Your
glasses must already be paired there and reachable — CamVerse talks to the glasses
through Meta AI, never directly.
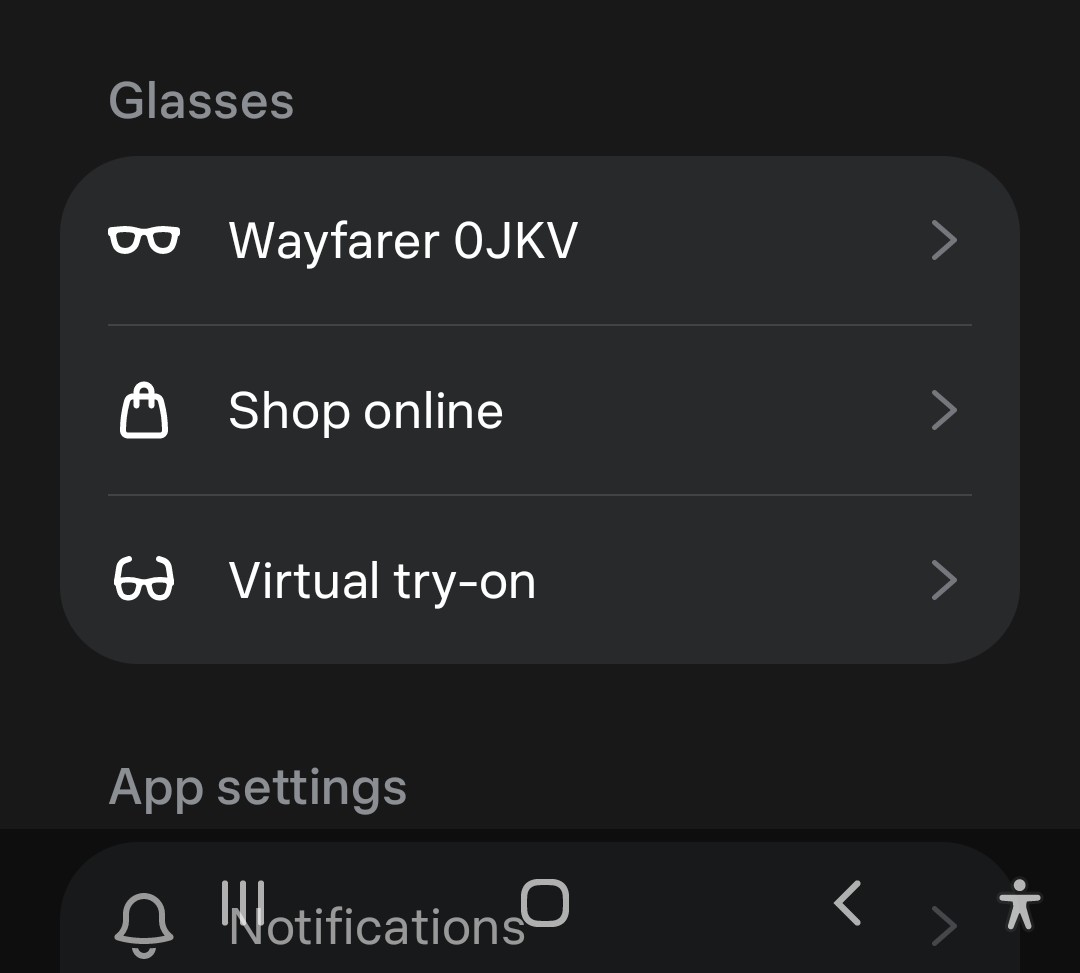
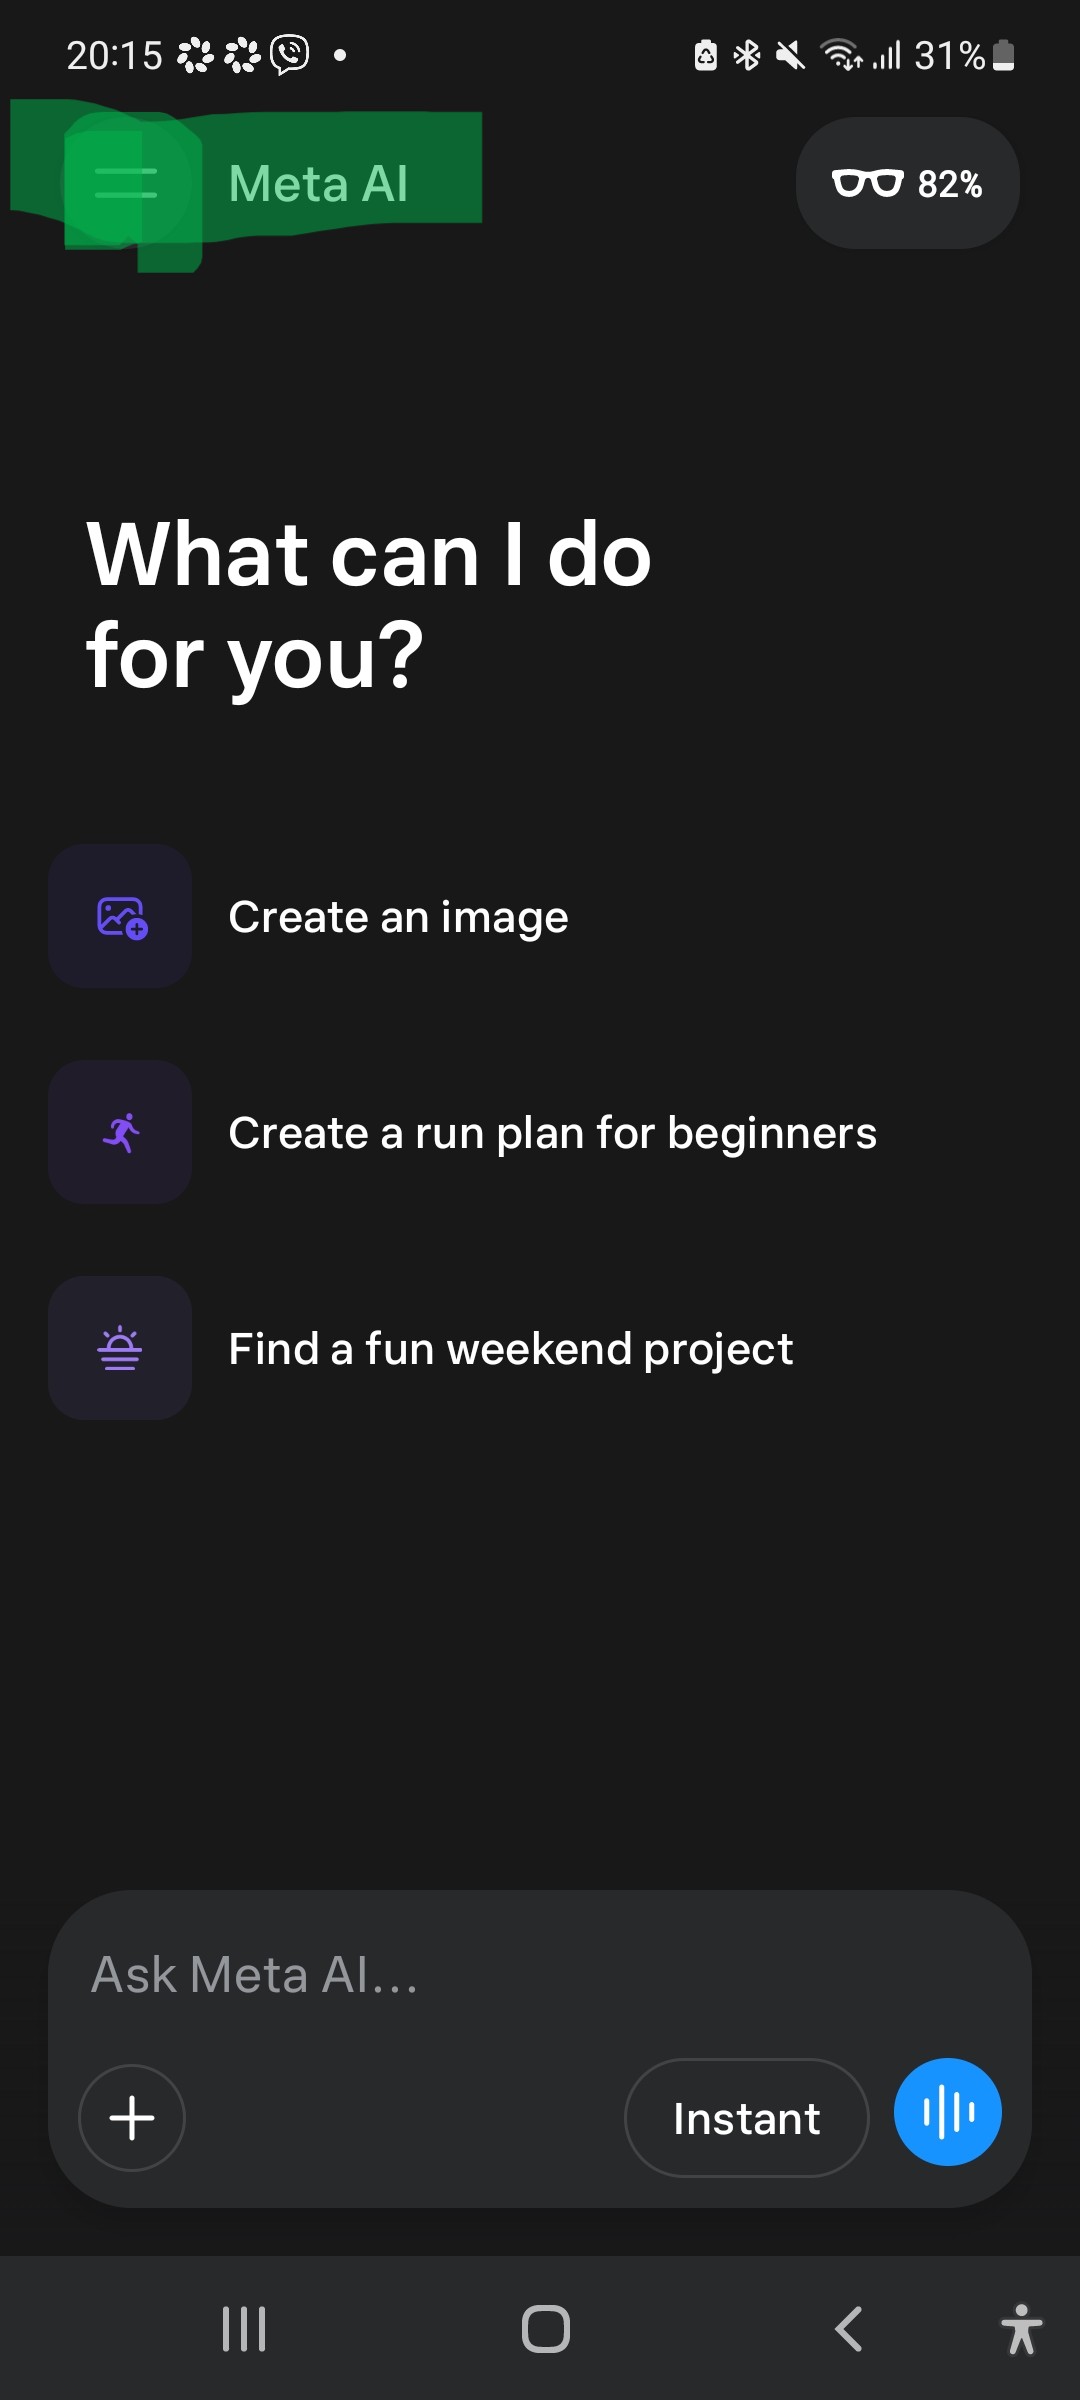
Your pair, listed by name — here "Wayfarer 0JKV". You will find this list under Settings › Glasses, just above the App settings block you are heading for in step 5. If nothing is listed, finish the normal Meta pairing first: this guide cannot help until that works.The proof that the link is alive: the glasses pill in the top-right corner showing a battery percentage. No pill means Meta AI is not talking to your glasses, and nothing further will work. Open the menu with the ☰ button, top-left.4
Open the Meta AI settings
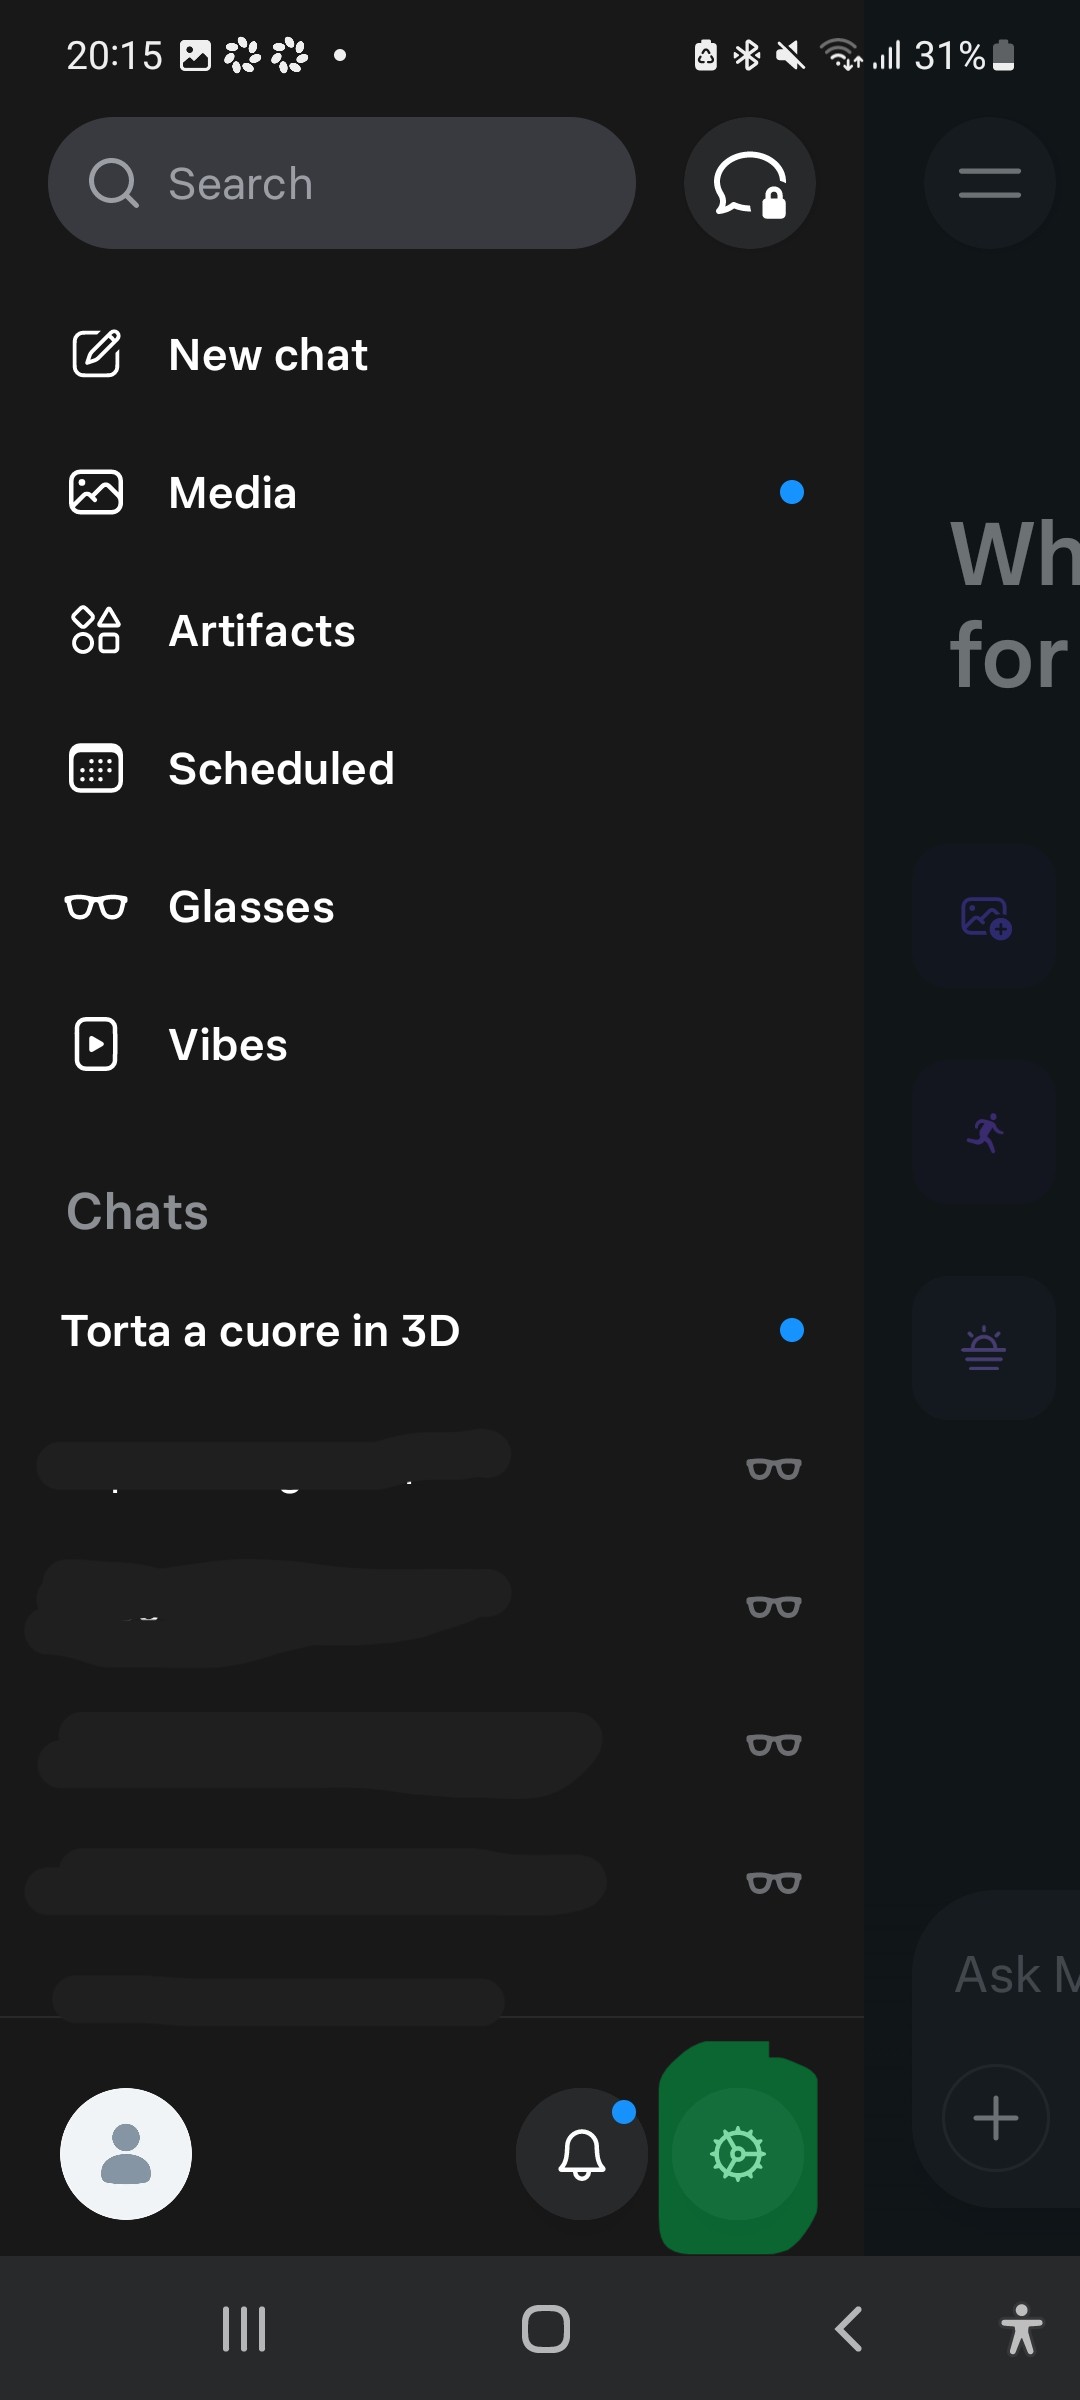
In the side menu, tap the gear icon at the bottom of the panel — not your
profile picture next to it.
The gear, bottom-right of the drawer. The Glasses entry higher up is the normal device screen — useful, but not where developer mode lives.5
Go to App info
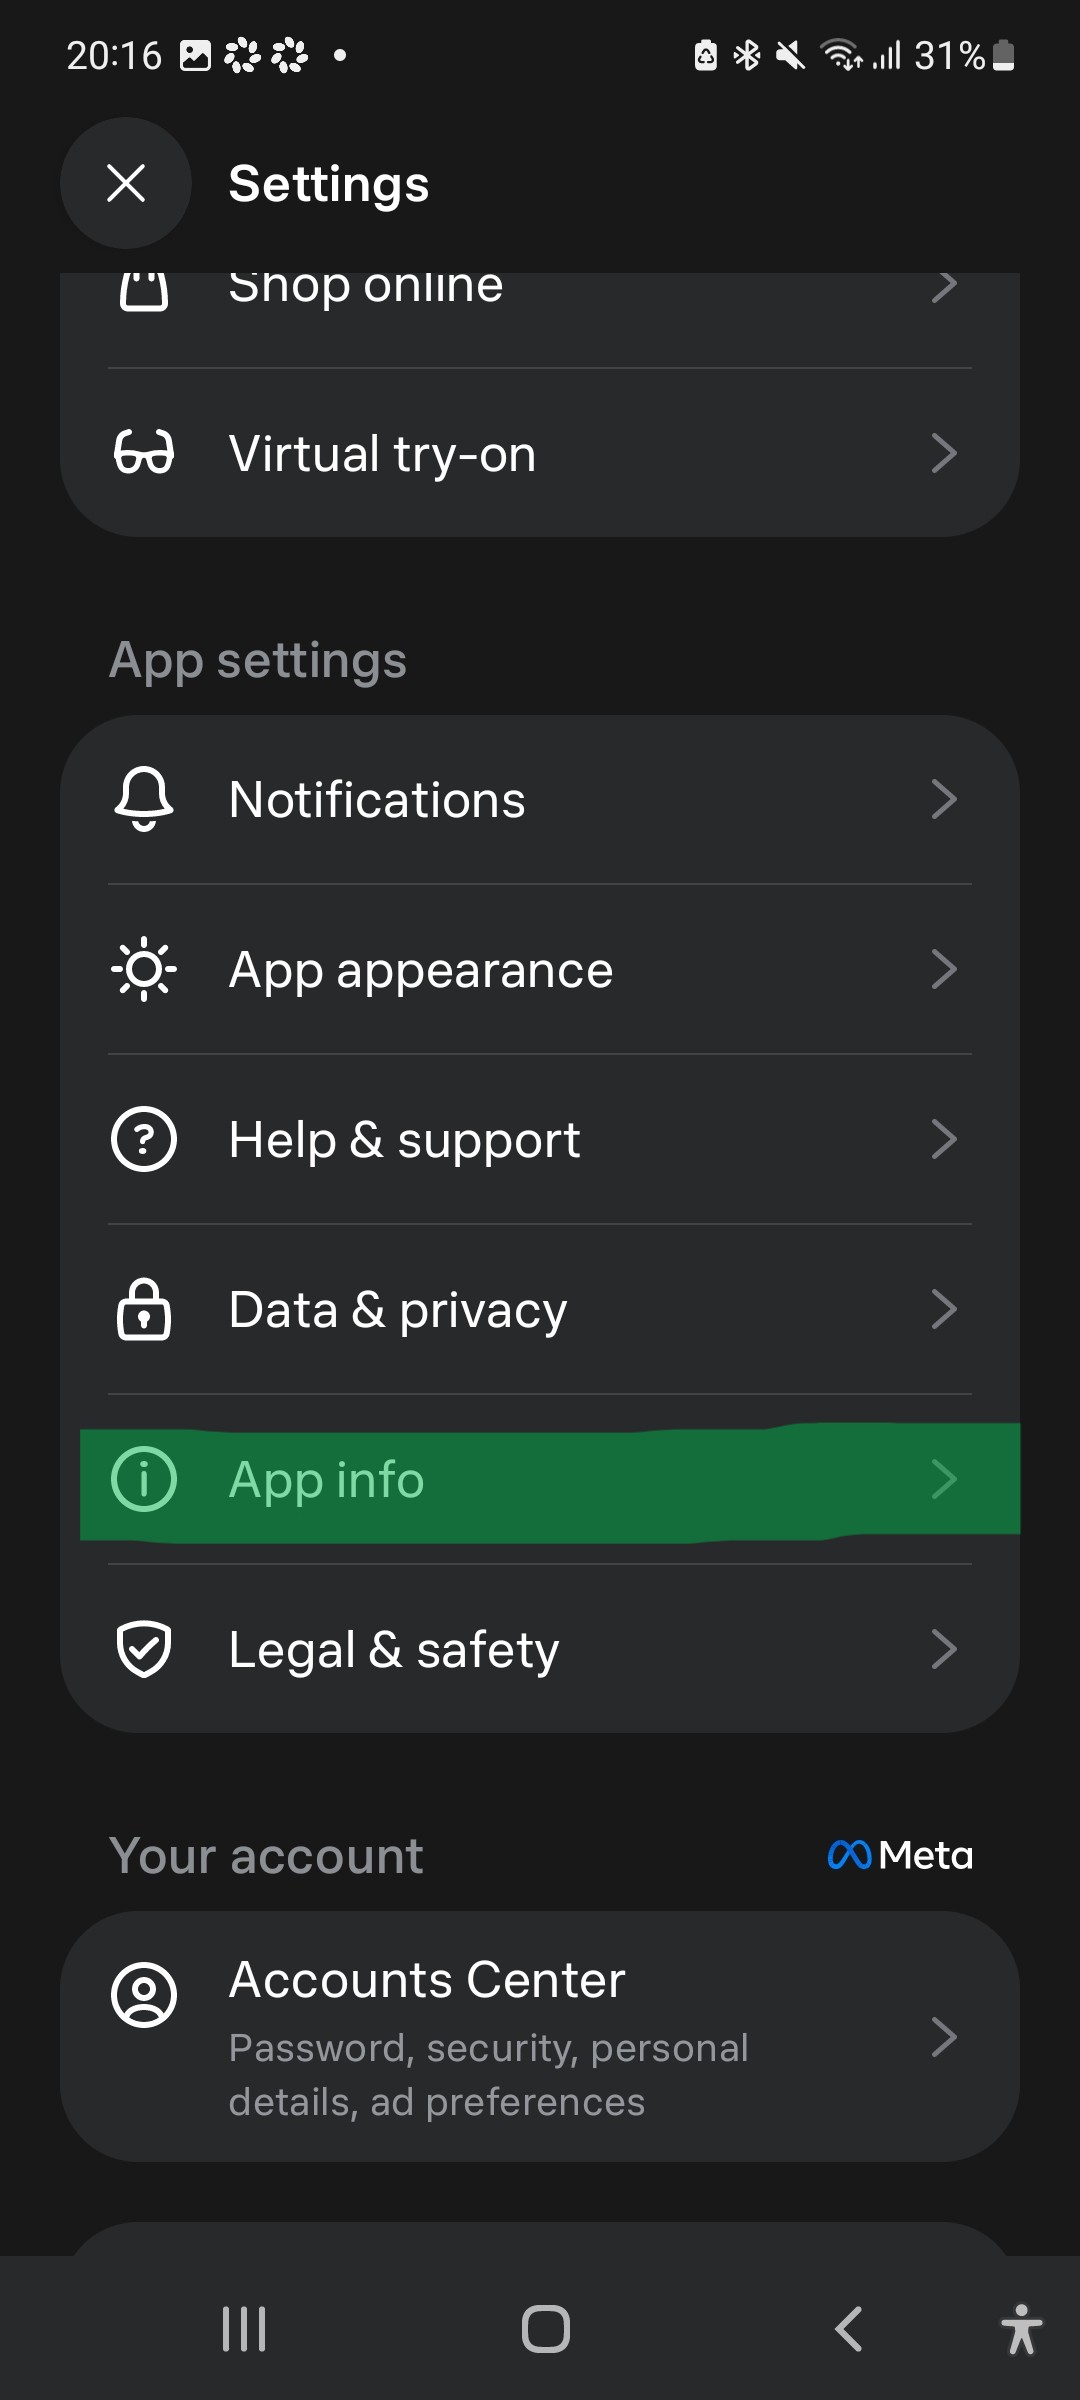
Scroll down to the App settings block and tap App info.
App settings › App info. It sits between Data & privacy and Legal & safety. This screen looks unremarkable, but it is where the two switches that matter live.6
Turn on Developer Mode and install DAT on the glasses
This is the step that decides whether any of this works. Two actions, in this order.
6a — Reveal Developer Mode, then switch it on
Developer Mode is hidden until you ask for it. On a fresh phone the App
info screen shows only the app version and language — no Developer Mode anywhere. To
bring it out, tap "App version" four times in a row, the version number
at the top of the screen. The Developer Mode block then appears underneath it.
Now switch it on. Its description reads "If you are developing for Meta AI Glasses,
Developer Mode allows you to use features required for app development". Turning it
on reveals one more row: your glasses, with their DAT status.
6b — Install the DAT app on the glasses
Under Developer Mode you will see your glasses by name — something like
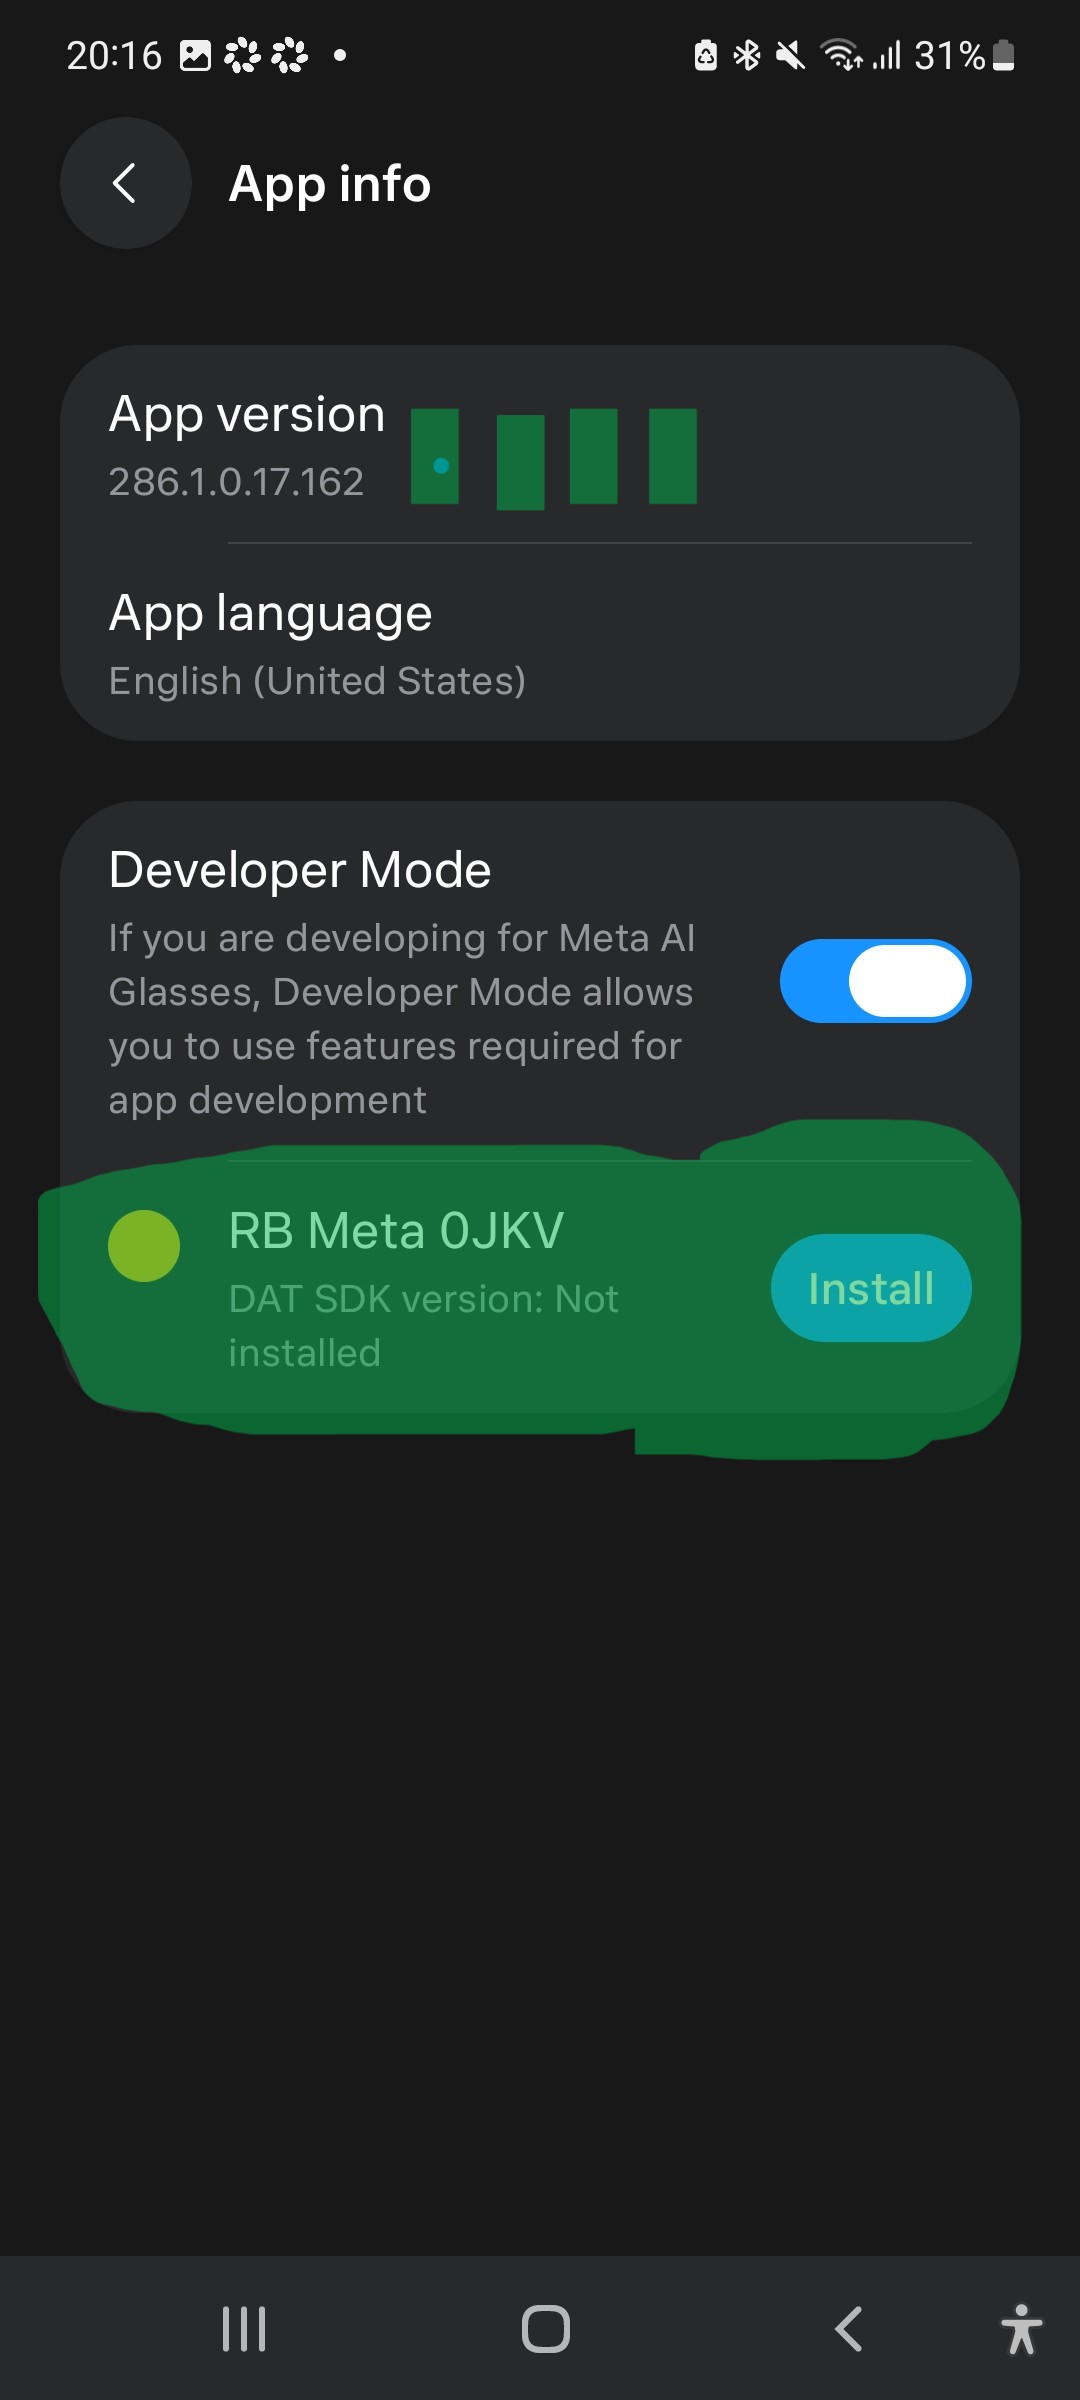
RB Meta 0JKV — followed by DAT SDK version. If it says
Not installed, tap Install.
Developer Mode on, DAT still missing. The four marks on App version are the four taps that revealed this section. Below it, "DAT SDK version: Not installed" is the exact state in which the glasses reject every connection attempt — silently, with no error you can see from CamVerse. Tap Install.
Be patient here
The install pushes a component onto the glasses over Bluetooth and it is
slow — expect several minutes, sometimes much longer. Keep the glasses
unfolded, near the phone, and leave the Meta AI app open on this screen. If it seems
stuck, put the glasses in their charging case for a minute and reopen the screen.
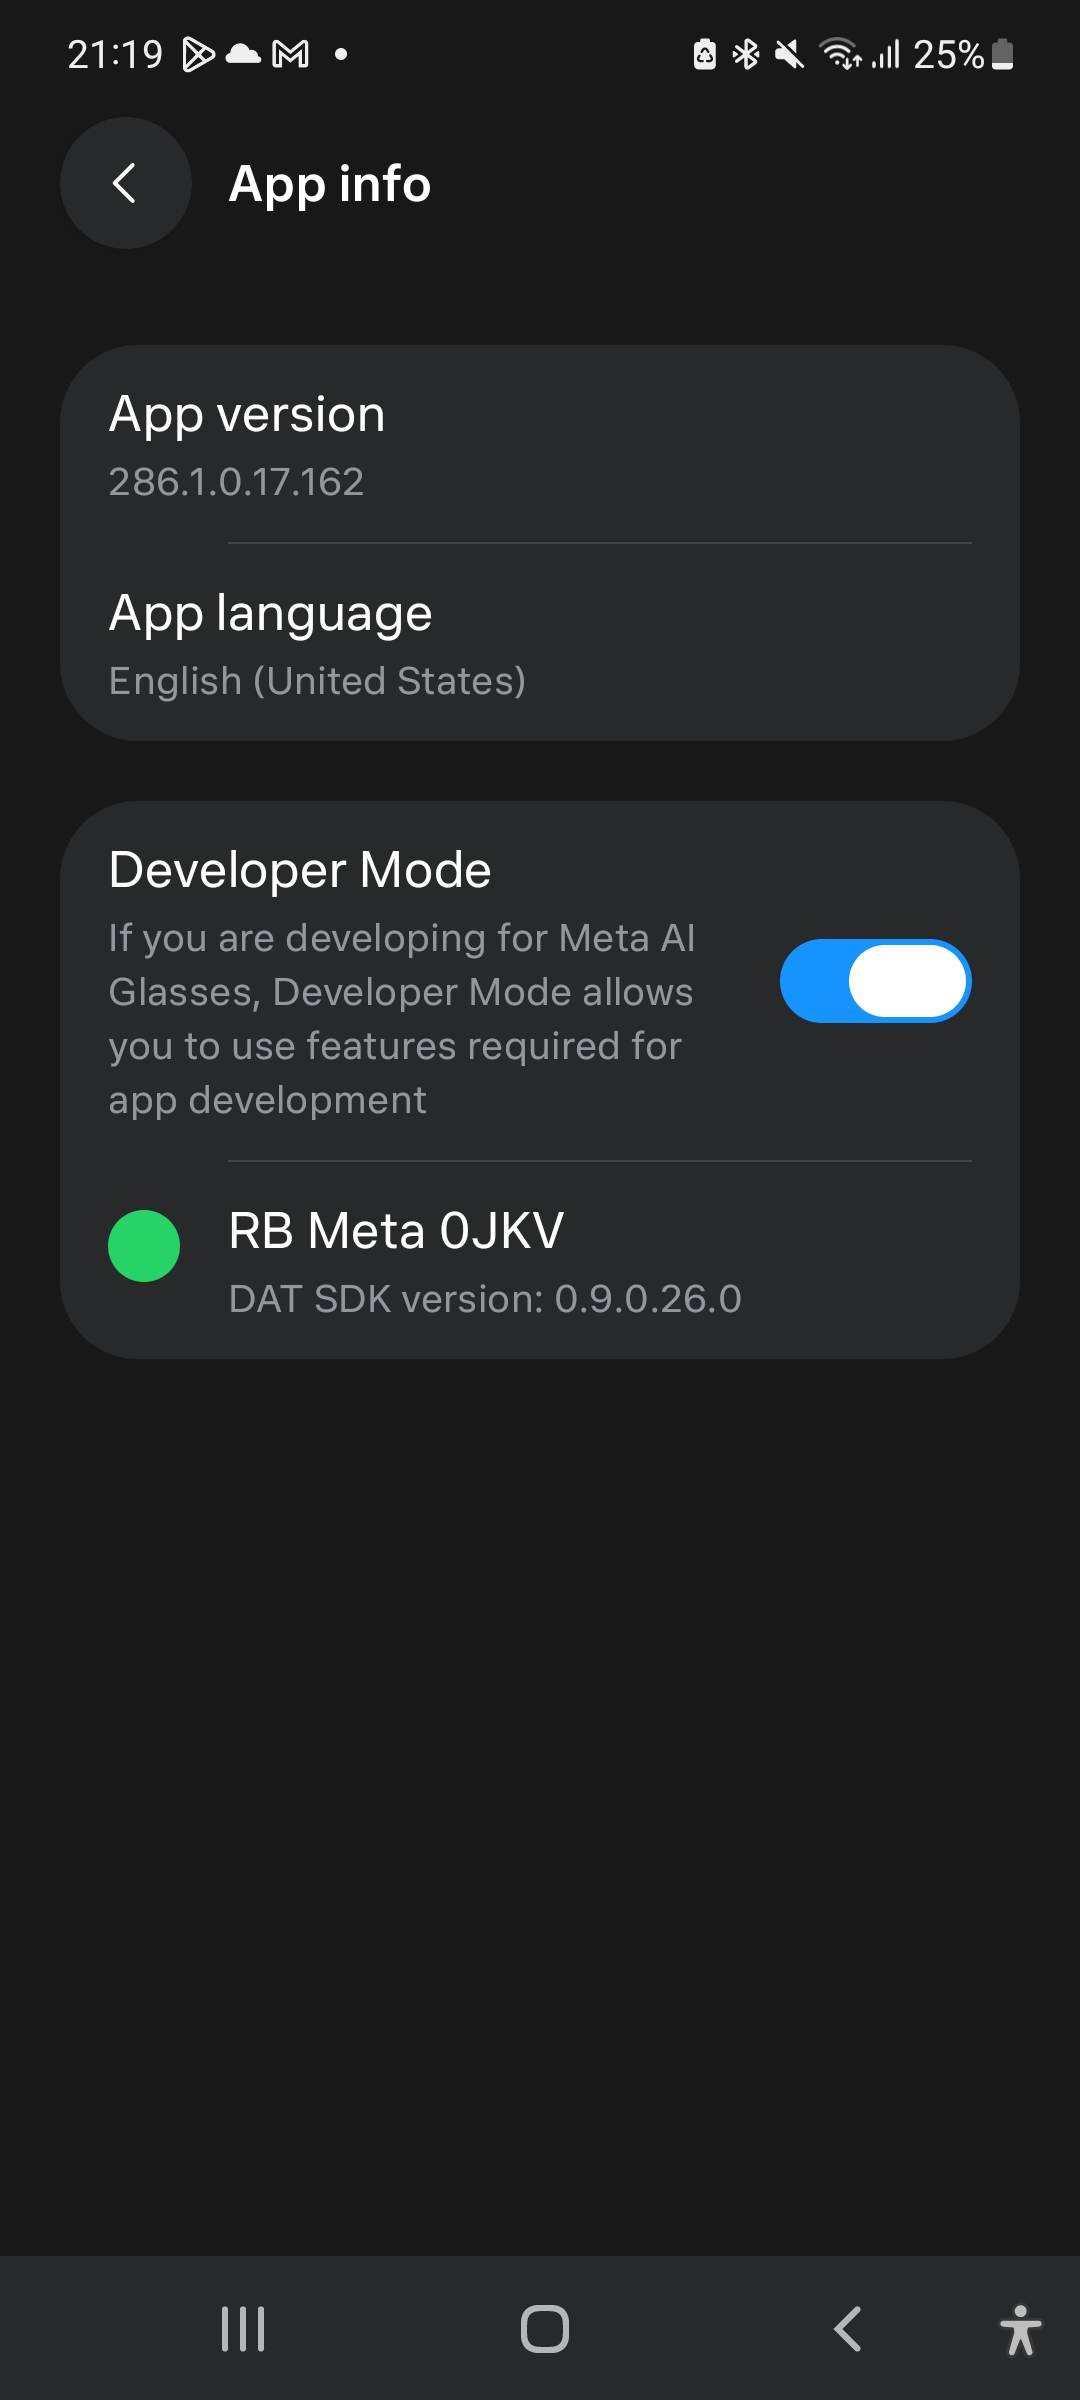
What success looks like: the dot turns solid green and "DAT SDK version" shows a real number — 0.9.0.26.0 in this case — instead of "Not installed". Do not move on until your screen looks like this: every later step fails if you do.
No Developer Mode section?
First, make sure you actually tapped App version four times — the block
does not exist until you do, and four deliberate taps work better than a fast drumroll.
If it still refuses to appear after that, your Meta account is probably not on the tester
list yet: go back to step 1, since that part is not something you
can enable from your side.
7
Open CamVerse and tap the glasses
Back in CamVerse. On the right-hand strip of source thumbnails, tap the
glasses card. Put the glasses on, or at least open them — a folded pair
will not start a stream.
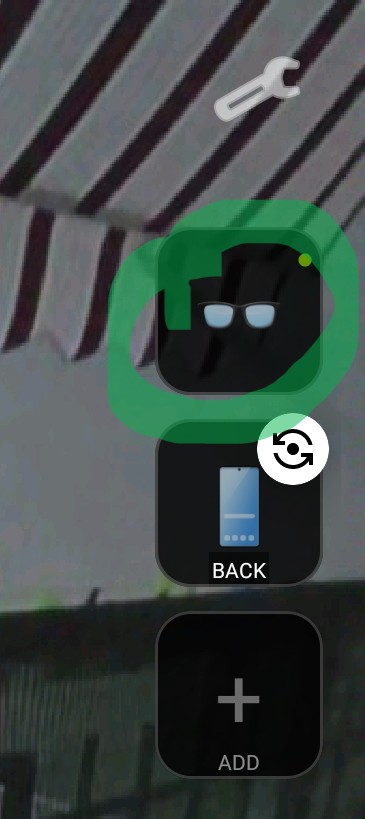
Tap the glasses thumbnail — the top card in the right-hand strip, above BACK and ADD. The small dot in its corner is the status light: red disconnected, orange connecting, green live. This same tap is all it takes on every later launch.
First run takes a moment
The first connection runs through registration, permissions and session setup in one go,
so give it 10–15 seconds before deciding something is wrong.
8
Authorise CamVerse on your Meta account
Meta AI takes over the screen and asks
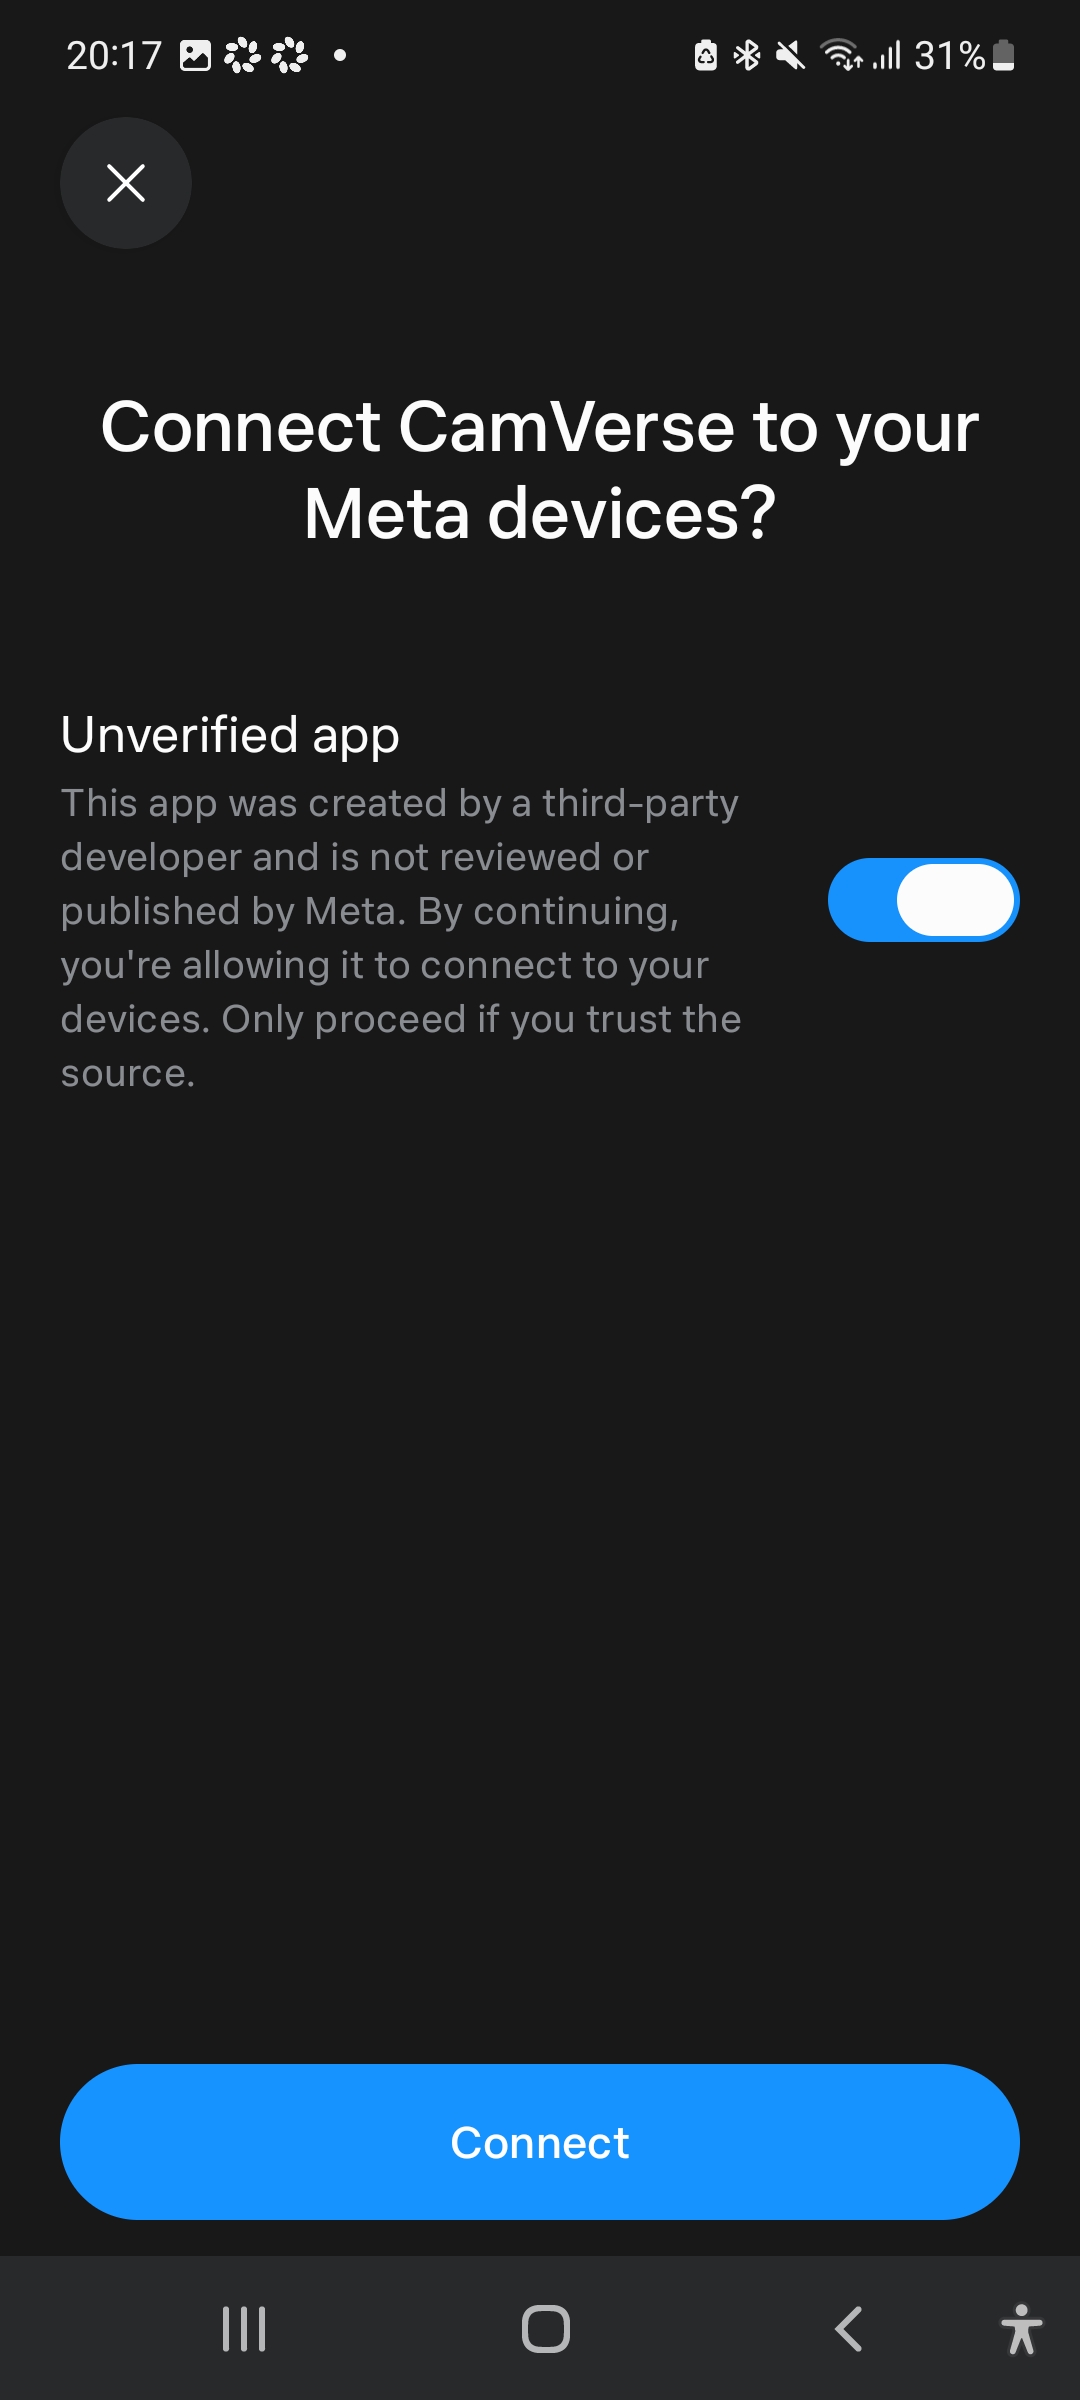
"Connect CamVerse to your Meta devices?". There is a catch here that
stops most people: the Unverified app toggle.
Turn the toggle on. It is off by default, and Connect will not complete without it.
The warning is accurate: CamVerse is a third-party app that Meta has not reviewed. That is what a developer-preview app is.
Then tap Connect.
Enable "Unverified app", then Connect. If this screen never appears and CamVerse just reports a failure, your account is not allow-listed yet — back to step 1.9
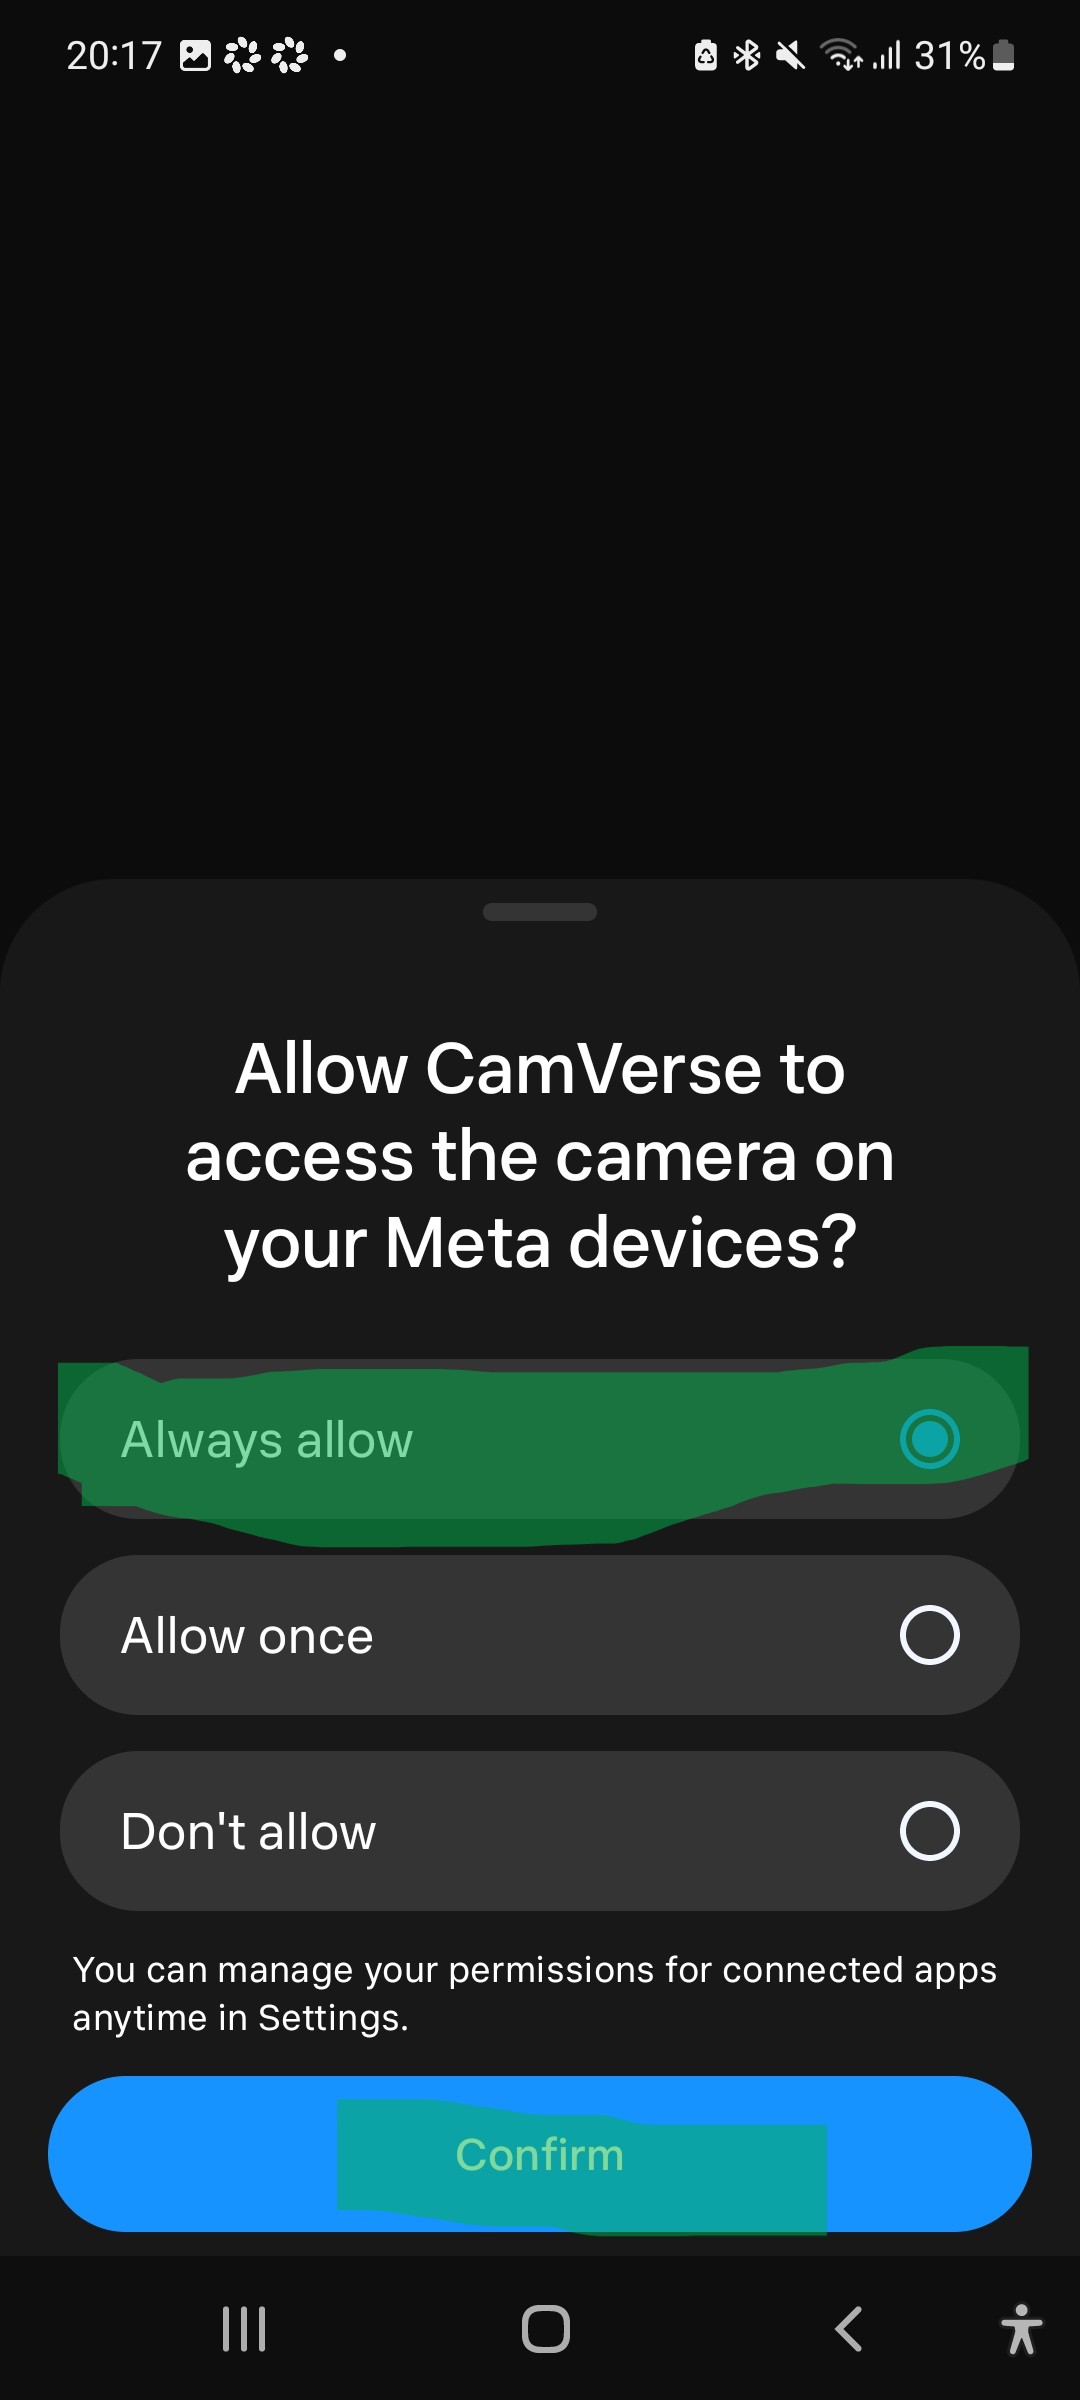
Allow camera access
A second sheet asks
"Allow CamVerse to access the camera on your Meta devices?".
Choose Always allow, then Confirm.
Allow once works too, but you will be asked again on every single launch.
Always allow is what makes CamVerse reconnect silently from then on.
Always allow › Confirm. You can revoke it whenever you like from the Meta AI settings, under connected apps.10
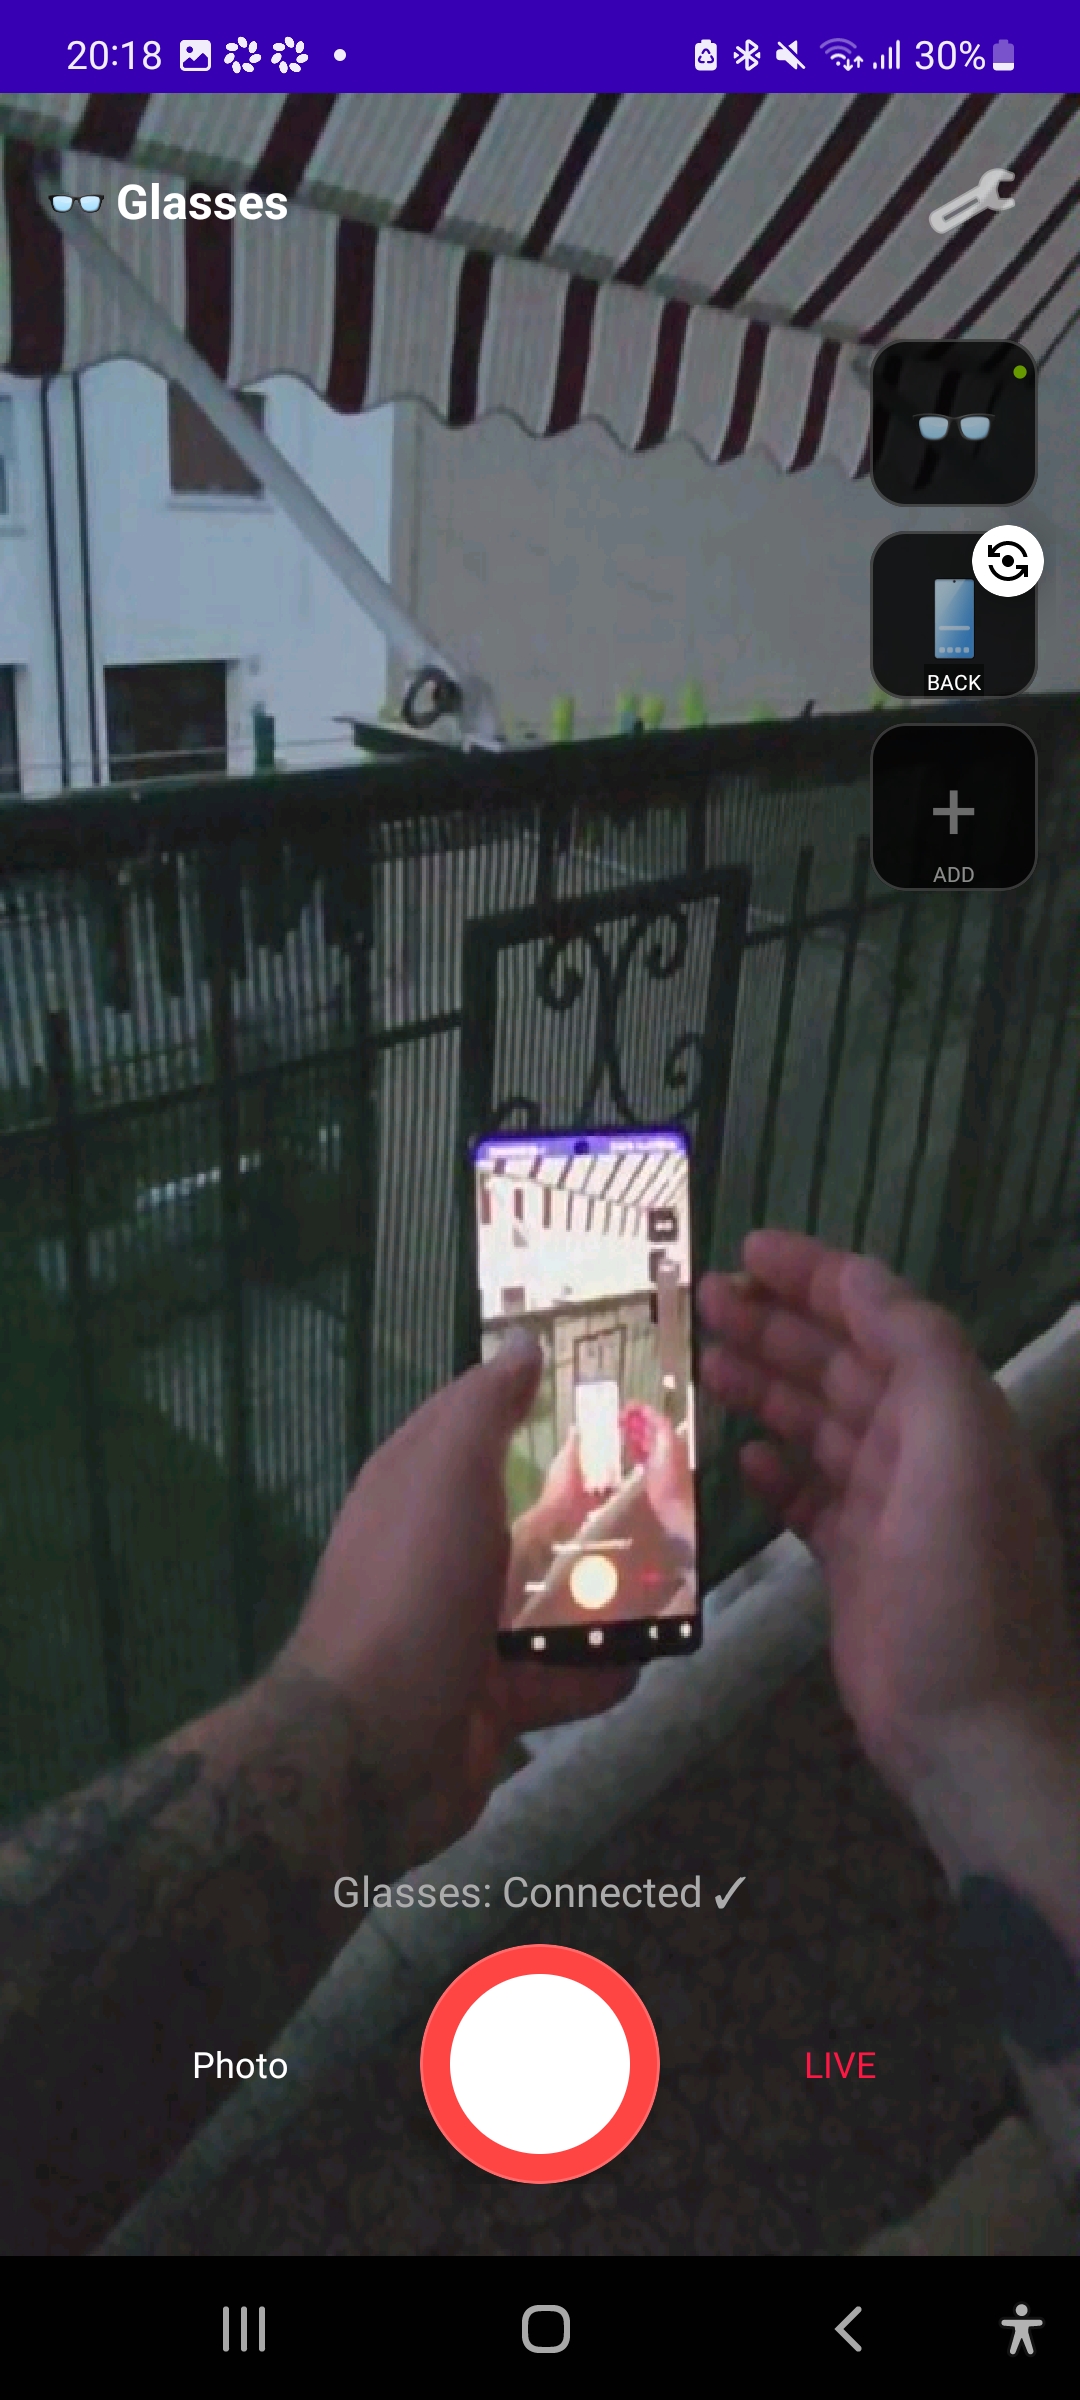
You are connected
CamVerse returns to the camera screen and the glasses feed fills the preview. The status
line reads Glasses: Connected ✓ and the card dot turns green.
Live POV from the glasses. From here the glasses behave like any other source: tap a thumbnail to switch to it mid-recording, hit the red button to record, or LIVE to stream.
Next time is easierSteps 1 to 6 are one-off. From now on it is a single tap: open CamVerse
and tap the glasses icon, and the feed comes up straight away — no authorisation screens,
no permission prompts, no Developer Mode. It does not reconnect entirely on its own, so
that one tap is still yours to make. All it asks is that the glasses are already
connected to Meta AI, unfolded and charged.
?
When it does not work
Almost every failure comes from the glasses refusing the session, not from CamVerse. In
rough order of how often they actually happen:
What you see
What it really is
Fix
Connects, then drops instantly
The glasses are folded. The hinge sensor gates the camera, so the request is refused before it reaches the lens.
Unfold them, or better, wear them. Then tap the card again.
Nothing happens at all
The DAT app is missing on the glasses. This is the number-one cause and it is invisible from CamVerse.
Step 6. Confirm the DAT row shows a version, not "Not installed".
No Developer Mode in Meta AI
The section is hidden by default. It is not missing — it just has not been revealed yet.
Tap App version four times on the App info screen. See step 6a.
No authorisation screen ever appears
Your Meta account is not on the tester list, so registration is rejected before any UI is shown.
Step 1. Send me the Meta account email and wait for confirmation.
Battery too low. Meta blocks camera streaming below a safety threshold to avoid a brownout.
Charge above 30% and retry.
Connected, but the preview stays black
The session is up but no video frames arrive — usually a stuck stream on the glasses side.
Close CamVerse, power-cycle the glasses in their case, reopen.
Permission popup on every launch
Allow once was chosen instead of Always allow.
Reconnect and pick Always allow this time.
Still stuck?
CamVerse can export a debug report: Tools › Export debug logs.
Email that file to
hanetroberto@gmail.com
along with your phone model and Android version, and I can usually tell you exactly which
of the steps above did not take.
Not on the tester list yet?
Send me the Meta account your glasses are paired to and I will add it. Access is manual
only because Meta's toolkit is still in developer preview.